
 Program.
User's Guide.
Program.
User's Guide.
|
Voting Systems.
Program.
User's Guide.
|
 |
PoliticalSim Guide
|
 |

|
Thanks for your interest in PoliticalSim. I'm sorry to have to tell you, years ago Microsoft stopped supporting Excel's original macro language. But I got the following, in December 2018, from a programmer who succeeded in running it. I hope you also succeed.
"Hi Robert, I'm having some fun using DOSbox. It's a tool that runs Windows 3.1, and I got Excel 4.0 running in it too. It took me a while to set up. I didn't realize this was a game until now. I thought it was a simulator that generated statistics. It seems like it's really developed. This is cool. It runs!
I was able to get into an election and find out who won. I think I did some things out of order, so I had a few errors. I think if I try again and actually read the help pages then it might do better. The really cool thing is that the debugger opened when the errors happened, so I can dive into the code and see how things work.
Level Zero(1) Most versions can decompress themselves when you open the download file. Versions with a name that ends in “.zip” need a program such as WinZip or SuffIt.  Commands to Note |
Level 1) Organize MenuGet Cities commandTry the Checkerboard city for its evenly spaced voters. This will make it easy to see the results of each voting rule. Click a “✓” in the “Get Voters” box. Cast Ballots and Tally Votes again to see the results.  Get Cities window |
Level 2) Create Parties1) Register Voters menuDo not put a “✓” in Redistribute. This will let you keep the voters in the checkerboard pattern while you change the percentages in each party faction. For clairity, do not check Mix Factions Together. On the right of this “dialog box” are 5 rows with 3 boxes in each row. The first column is for a party's name; the second is for its “Z level”, explained below; and the third is for its percentage of voters. Try putting most voters, 60% to 80%, in the Blue party and make their Z=0. Then put the other voters in the Green party and make their Z=9. These Z levels make all Blue voters rank all Blue candidates above all Green candidates.* * This works because the map is 6 units wide and 6 tall. It is less than 9 units from corner to corner. So the distance between Z=0 and Z=9 puts the Green candidates further from the Blue voters than each of the Blue candidates.  The X and Y dimensions are the width and height of the Map page on your computer screen. The Z dimension goes in and out from your screen and is shown only by the color of the voter or candidate. If you set parties at different Z levels and forget it, you will wonder why a candidate loses despite being close to many voters on the X-Y screen. |
2) Nominate Candidates: A party's candidates ought to have the same Z level as its voters.
You can move each candidate by hand: Hold down the Control key and slowly click twice on a candidate, then move it along the X or Y dimension. You can also move candidates by directly changing their (X, Y, Z) numbers on the Register page. To update the map, hold the control key as you tap the = (equal sign) key.  Distribute Candidatees window
|
Level 3) Test a New ConstitutionSet Voting Rules: Now your're becoming a master of political designs. Select a voting rule from the list of proportional, semi-proportional and winner-take-all rules. Then set your rule's quota if needed.
|
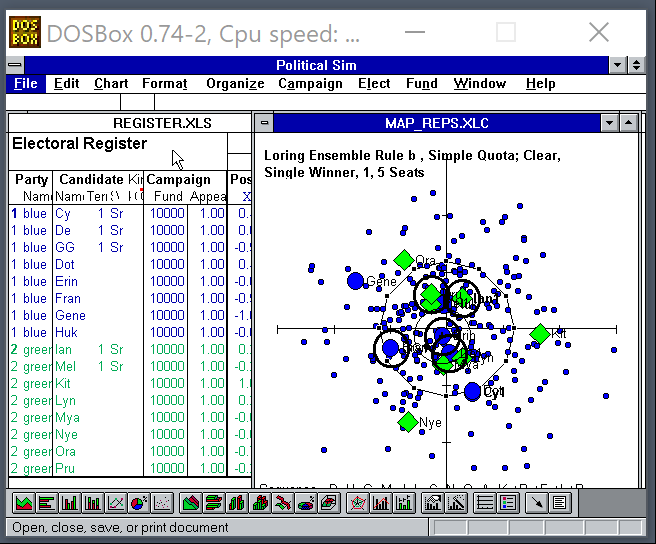
Elect Menu1) Cast Ballots 2) Watch Returns The option to Show STV Transfers is worth watching when running a tally of Single Transferable Vote or the Loring Ensemble Rule. Notice: Are winners all from 1 party? What is the pattern elected by the current voting rule: central, proportional fair shares, one-sided or erratic? Single Transferable Vote, Simple Quota, 5 Seats
|
|
PoliticalSim can tally voting rules which require single-member districts but they do not work well in games. They require maps that show which district each voter and candidate is in by the shape of his or her symbol.
PoliticalSim can create new elections automatically, mesmerizing like a screen saver, we call it the “Lava Lamp” mode. To start it, select Run Research on the Organize menu and step through the dialog boxes. When you get to “News Coverage”, set the Number of Elections at 99 (or less if you want) and set “Record Results to Column” 0 (zero or blank). Although this mode was built for statistical research, you don't want to create dozens of statistical files while running it for amusement. |
| ||||||
|---|---|---|---|---|---|---|
| Electoral Systems | Legislative Systems | |||||
Chair
| Reps
| Council
| Policy
| Projects
| Budgets
|
Review
Software Printouts  To Do U.S. Reforms Future rules Voting Glossary Resources |
 |
 |
 Accurate Democracy
